Site Map
Quest. & Ans.
Glossary
Timeline
For Teachers
Review Article
Central link


Performing Gilbert's Version of the
Induced-Magnetism Experiment

(This is an attempt to recreate Glbert's experiment on induced magnetism. It was later superseded by a more effective and elegant version, here.)

  • To repeat this experiment you will need
    • A fairly strong bar magnet. Horseshoe magnets or wall magnets, with two poles close to each other, are not suitable.
    • A support for the magnet, holding it vertical. A small cardboard box, on its side and with a hole punched in it to hold the bar magnet (drawing below) might work well.
    • About a yard (meter) of sewing thread, and scissors to cut it.
    • Two straight pieces of soft iron wire, 8-10 cm long (3.25 to 4 inches; none of the dimensions in this experiment needs to be exact). These are the suspended bars, and you can cut them from a wire coat-hanger. Do not try this experiment with nails or needles, they are made of steel (iron with a little carbon dissolved) and once they touch the magnet, they remain magnetic (though perhaps not too strongly). Baling wire may work too, but is a bit thin and light.
    • A round nail, a piece of the wire (if it is thick enough), or the barrel of a ballpoint pen.
    • Painters' masking tape
    What you do:

    1. If you have an electronic watch, you may be better taking it off. It should not come close to the magnet.

      Prop the bar magnet in the box (or whatever you use), so that it stands vertically, one pole up.

    2. (a) Cut and straighten the pieces of soft iron wire.
      (b) Cut two short lengths of string (5 cm or 2")
      (c) Prepare two pieces of masking tape, about 8 mm (3/8") wide and up to 1" (2.5 cm) long.

      Use the string and tape to make two small suspension loops (about 1 cm or 1/2") to suspend the wires. First stick one end of the string near the end of the tape (drawing A), stick that end to the wire, roll it around the wire and insert the other end on the opposite side of the wire (B). Finish rolling the tape, then use scissors to cut off the excess string (C).

    1. Take the remainder of the string, thread its end through one of the loops and close it in a loose loop, tying its end. (Keeping it loose allows you to cut that piece and remove it from the suspension loops; a tight knot would not let you do so.)

      Do the same with the other suspension loop, keeping distance of about 50 cm (20") between the bars. Cut off the excess.

      You should now have two short wire-bars hanging at opposite ends of a string.

    2. With the wires hanging down in parallel (and not entangled!) take the middle of the string and wrap it twice around the nail or ball-point barrel. By twirling the nail with your fingers, you should be able to bring the two wires to exactly the same height.

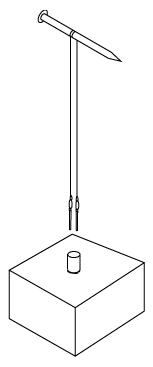
    Hold the nail still until the hanging wire-bars stop moving and are a short distance apart (a few millimeters or 1/8"). Then carry them to hang above the pole of the magnet (see drawing). Gently lower them towards the magnet, and if all goes well, you should see them move apart to about 2-3 times the distance. It is not a large effect and, contrary to Gilbert's illustration above, the wire-bars stay parallel, they do not form an angle.

    When the wire-bars are removed, they slowly move together again and the experiment can be repeated

    Back to   Experiment on Induced Magnetism

    Next Stop:   Magnetism from Gilbert to 1820


    Back to the Master List

    Author and Curator:   Dr. David P. Stern
         Mail to Dr.Stern:   earthmag("at" symbol)phy6.org

    Last updated 25 November 2001