Sudoku: step-by-step solution of a harder puzzle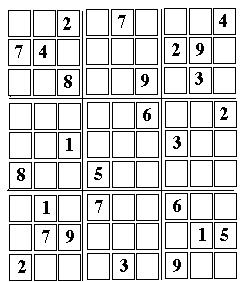
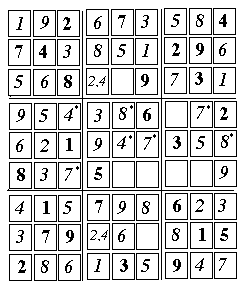
Solving a Harder Sudoku PuzzleWhat you see and what you getThis is a step by step solution of a random Sudoku "devilish" puzzle, intended to demonstrate additional methods of solution. It is a follow-up to a web page analyzing a simpler puzzle--simpler, though not too easy, either. If you have not done so, it might be a good idea to start there.As before, follow the steps listed below provide an idea of how the solution is derived. There may exist other approaches--but here are the methods I used, and they worked. The array used is pictured above; it is suggested you bring it up on the screen (in larger format) by clicking here, print it and then use a pencil to fill in the empty squares, in the order of the steps outlined below (you may add in the corner of each cell filled its number in the sequence of steps, to help retracing your route). As before, some intermediate stages of the solution will be shown, with added numbers marked with *. (the lines below are repeated from the earlier puzzle)
A Sudoku puzzle contains 9 rows of 9 numbers, each containing (1, 2, 3 ... 9) in a different order, and the same holds for the columns. In addition, however, each Sudoku array can be divided into 9 smaller 3-by-3 squares, each of which which also must contain all the numbers (1,2,3....9). In fact many such arrays exist. The challenge of the puzzle is--given just some of the numbers of a specific array, fill in the missing ones, using only logical deduction based on the above requirements. The puzzle consists of a square array of 81 cells, which can be divided into 9 columns, (counted from the left), each containing 9 cells. In each column, cells are numbered from the bottom. Or else, it can be divided into 9 rows (counted from the bottom), each containing 9 cells. In each row, cells are numbered from the left. A notation like 6 (3,2) will mean the number "6" in cell 2 of column 3 Extra division lines (or darker ones) divide the array into 9 boxes, each with 3 rows of 3 cells each. To define the positions of boxes, it is easiest to classify them by stacks and tiers: Three boxes in a vertical columns will be called a stack (distinguishing left, right or middle stacks) Three boxes in a horizontal row will be called a tier (distinguishing bottom, top or middle tiers) The requirement of the puzzle:
No number may be repeated, none can be left out. Added Comment on Unresolved PairsAdditional notes on solving the puzzle can be found with the preceding puzzle. The hints there include "solution rule 2" or SR2:
If that variety includes all numbers except for one, that remaining number is the only choice remaining. Here this rule is not sufficient, and we may need use cell where, on applying this method, all numbers but two are eliminated. By itself, this information is not particularly useful--knowing, for instance, that the only numbers which can appear in that cell would be 2 or 7. However, if we test another cell in the same box and also find that the number in it must be either 2 or 7, then we have an unresolved pair. These two cells must contain 7 and 2: we do not know in which order--and it may take a while before we do--but in filling other cells in the same box, we may safely assume that the number needed is not either 7 or 2. Instead of "box" we may equally write "row" or "column". In particular, if all cells except for two in a row or column are filled, the two cells left are also an unresolved pair. That is no help in filling other cells in that row or column--they are already full!--but if these two cells also belong to the same box, the information may help fill other cells there.
Numbers entered as part of the solution will be introduced in the order in which they are derived, numbered in parentheses. Copy the puzzle here, print it and enter numbers as they are derived. Unresolved pairs may be written in tiny numerals--and if you use a pencil, you can erase ambiguous entries when they can be replaced by final ones.  The first 13 cells are relatively easy--but can't be skipped, they will be needed later.
[1] 2 (8,3)
 [8]
8 (7, 2)
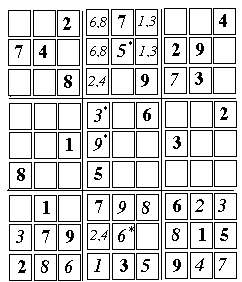
Now choices become limited. Using SR2--in filling an empty call, excluding all numbers of the same row, column or box--may leave one not with one choice but two. In the middle box of the top tier (6, 9) can be 1 or 3 (6, 8) can be 1 or 3 , too.
(4, 9) can be 6 or 8 only (4, 8) can be 6 or 8 only, too, by a similar argument.
[14] 5 (5, 8)
[15] 6 (5, 2)
The top box and the bottom box in the middle stack each have two empty cells, in the same row. Taking into account cells with known contents (including unresolved pairs in the top box), these cells must contain either 2 or 4. Two of the cells on top and bottom share the same column, and therefore their numbers must differ. They too, are an unresolved pair. (Each also forms a separate UP with the empty cell to its right, but that is not used right now). In the drawing above, UPs are denoted by two numbers sharing the same cell Even if the order of 2 and 4 in the above pair is not known, the remaining two cells in the 4th column must contain 3 and 9. There is already a 3 at (7, 5), so [17] 9 (4, 5) ---------------------------- [18] 3 (3, 8)
[20] 1 (6, 8) 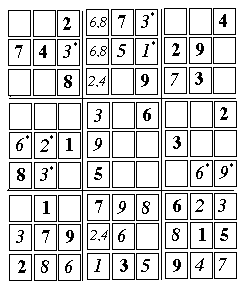
[21] 9 (9, 4)
[22] 3 (2, 4)
[23] 2 (2, 5)
Also, the middle box of the first stack has only one place open for the "6":
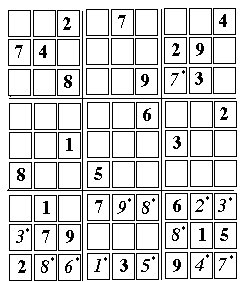
Now consider the two top cells in the left-hand bottom box, (1,3) and (3,3). They must contain the numbers 4 and 5, but in which order? Sometimes a clever observation can tell the correct choice, but at first I found none. The alternative (which is the only way in some devilish puzzles), is to trace the consequences of each choice, and see which one leads to a dead end. Computer programs to solve Sudokus use this approach, but a machine can trace choices much faster than a human. (Ultimately a better way was found--see here) Lets start by trying one of the two possibilities--that in the bottom box, (1,3) on the left contains "5", and (3, 3) on the right contains "4".
Illustrated above are two diagrams of the puzzle. On the left is the diagram with all the values available before the guessed choice was made. On the right the guessed values for the top of the bottom-left box [27A] 4 (3, 3)
Having placed the "4", we can now complete column 3, and because of the "5" in (4,4), only one choice remains: [29A] 7 (3, 4)
We proceed to the top left box. Somewhere in it must be a "5" and a "6", but these can only be in the middle column--in the two flanking columns, those numbers are already in place, lower down in the puzzle. However, before trying to place them, it helps to examine the right hand top box, which has 4 empty cells--two on the right edge of the puzzle and two on the top edge--and the missing numbers which go there are (1, 5, 6, 8). Of these, "5" cannot be on the right edge of the puzzle, because the column along that edge already has a "5" at (9,2). Therefore "5" must go into one of the cells along the top edge, either (7,9) or (8,9). Therefore, no matter which of the two it is, another "5" cannot go into the top row of the left hand top box. This decides our choice in placing the next two numbers: the "6" must go on top, the "5" below it. [34A] 6 (2, 9)
The placing of the "6" in the top row resolves the ambiguity of the unresolved pair in (4,9) and (4,8), either of which could hold either a "6" or an "8." Because of [34a], that choice is decided as [36A] 6 (4, 8)
And here comes the crunch. Only one free cell remains on the right-hand edge of the puzzle, cell (9,5), and the only number missing in that column is "1." However, that row--row 5--already has a "1" in it, in cell (3,5)! 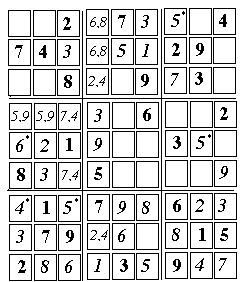
Therefore, the assumed placement does not work and we are left with: [26] 4 (1, 3) [27] 5 (3, 3) Two more unresolved pairs must now be added in the middle box of the first stack: The two blank cells in column 3 ((3,4),(3, 6)) must hold 7 and 4. Then, the first two cells in row 6, ((1,6),(2, 6)) must hold 9 and 5.
[30] 1 (9, 7)
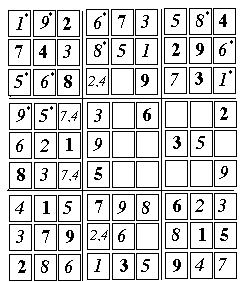 [31] 6 (9, 8)
And completing the box: [32] 8 (8, 9)
[33] 8 (4, 8] [34] 6 (4, 9)
[38] 5 (2, 6)
[39] 6 (2, 7) Last empty cell in column 2.
[47] 4 (5, 5)
[48] 2 (5, 7) One ambiguous pair [49] 4 (4, 7) 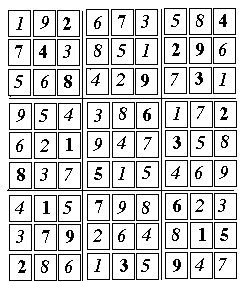
[50] 2 (4,2) Another ambiguous pair
[54] 1 (5,4) [55] 1 (7,4) ---------------------------- Further ExplorationAn article "The Science behind Sudoku" by Jean-Paul Delahaye appeared in Scientific American, June 2006, p. 80-87.(Also cited in the preceding web page.) |
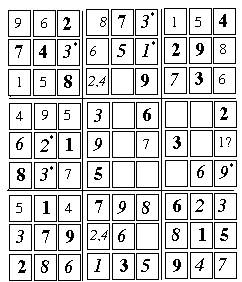
 [44] 4 (3, 6) Ambiguity removed by step [43].