(E-4) Wiring Puzzles and the "Enigma"
If connection to the "hot" wire exists and the lamp is lit, clicking either switch breaks it.
If no connection exists between the "hot" wire and the lamp (which is therefore turned off), clicking either switch establishes it.
Each square represents a 4-way switch wired to reverse the connection between input and utput. The "hot" wire enters on the left and the last wire connects to the "hot" side of the lamp; the return wire is connected directly to the lamp at all times. 
Assume you are dealing with a DC circuit, and the "hot" wire (or + polarity) entering on the left is the one on top. Each reversing switch may or may not reverse the electric polarity. The lamp will be lit if the last wire, leading to it, also has "+" polarity. Otherwise, it will be turned off. Flipping any switch reverses all polarities between it and the lamp. If the lamp was connected to the "+", it will now no longer be. If it was NOT connected to the "+", it will be now. Note that the last and first switch do not use one of their input sides. They may thus be replaced by 3-way switches. The Enigma Code Machine (Optional)Up to now only simple switches were discussed: more elaborate ones also exist, providing the electrical current with a larger number of choices. Switches with 26 choices, each corresponding to some letter of the alphabet, were behind the famous "Enigma" coding machine used by the German armed forces in World War II. 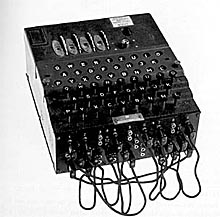
At the heart of the "Enigma" was a set of three disks (or "rotors") able to rotate around a common shaft, each with 26 matching metal contacts circling the center, on the front and on the back of the disk. Inside each disk, wires scrambled the order of electrical contacts, so that current entering (say) the front-side contact corresponding to the letter "A" would arrive at the rear-side contact corresponding to (say) "J". The contacts could be labeled A, B, C... Y, Z, one for each letter of the alphabet, and each was capable of making an electrical connection with the facing contact touching it. The machine had a keyboard like a typewriter, and also a set of 26 lightbulbs, electrically connected to the 26 electrical contacts on the front of the first disk. Each of these contacts could link electric current either into the machine from a key corresponding to a letter, or out of it to a lightbulb corresponding to another one. It could not do both at the same time: when the "A" key was pressed, the contact to the "A" lightbulb was interrupted and that lightbulb stayed dark. However, the same key also connected the battery to the "A" contact of the first disk, and that lit a lightbulb at the end of all the complicated connections inside the machine. When the operator pressed the key "K" (say), the source voltage was connected to the contact on the first disk corresponding to "K". The contact at the back of the disk would then connect the corresponding contact (always a different one) on the second disk, and from there the voltage would be passed to the contact on the third disk. In the back of the machine was a "plugboard" of scrambling wires, which returned the electrical current to disk "3" in some different place, and from there through "2" and "1" to the lightbulb marking the encoded letter. If one pressed key K, for instance, the plugboard would return the current through the three disks in reverse order, reaching the contact of the letter "D", and the "D" lighbulb would then glow. The plugboard ensured that the electrical path back to the first disk was different from the one by which the current reached the plugboard, so that when "K" was pressed, the current could never flow back to the "K" contact again, but always to a different letter. As noted above, inside each of the disks, hidden from view, were wires that routed the power from each input contact to some other contact on the output side. So if "K" was pressed, the current may emerge from the "M" contact on the other side, the touching contacts might feed it back to "C" of the second disk (which may have been rotated to a different angle than the first), and it might be further scrambled by the wires inside that disk to "F". The third disk added another scrambling, and so did the plugboard, and the connections were further scrambled on their way back through the 3 disks--by the wiring of the 3rd, then 2nd, then 1st disk, to a set of lamps labeled with letters A, B, C ... Z. What made the Enigma different...At this stage, all this would produce would be a fixed substitution code--"D" for "K", "Q" for "E" and so forth, depending on the setting of the disks and plugs. Such codes are easily broken. What set the "Enigma" apart was that each time a letter was typed into the machine, the rotors turned by different amounts, constantly changing their combinations. In the original Enigma, the rotors were turned by a small transfer gear, as in the mechanical odometer of a car (see photograph labeled "gear type advance mechanism..." here). Each rotor had on its forward-facing side a cogwheel (you can imagine it as having 26 teeth; actually, a ratchet wheel with 26 cogs controlled the settings), and on its back-facing side one cog stuck out. Whenever a key was pressed, the first wheel rotated one cog, so the next letter typed had a different connection to disk 2. Once in each rotation the single cog sticking out of the rear side of the wheel reached the transfer gear, turned it by one cog and caused the second disk to advance by one letter; and once every rotation of the second gear, the transfer to the next transfer-gear rotated disk 3. In a car odometer, each wheel has 10 cogs, so adjacent gears count single miles or kilometers, tens, hundreds and so on. Here each wheel had 26 positions. Later models of the enigma used ratchets, gears with sloping gears, in which a small lever ("pawl") pushed against them and only allowed rotation in one direction. Instead of a single projecting cog, the rear-facing side of each disk carried a wheel with one notch (acting like a ratchet with one cog), and when that notch reached the position of the pawl, the pawl slid into it and moved the next ratchet one letter ahead. The overall result was the same. On the web you can find a Three Rotor Enigma Simulation in several languages, showing the intricate path of each encoding signal (the "Help" file there leads to further details). The arrows allow you to change the initial settings of the rotors, and you can drag reflector connections to new positions. Copy the encoded message, reset the rotors to the same initial positions and enter the encryption: the plain text then appears below. The initial setting of the wheels (done by hand differently each day) was all important, for it decided all later settings in sequence. Furthermore, the wheels were removable and a choice of replacement wheels was provided, allowing many choices of initial settings. And the connections between key and lamp were symmetric: if on step 526 (say) key "A" connected to lamp "S", the two were connected by a complex electric path, but the same path could be traced in the opposite direction--key "S" would activate lamp "A". This way, when the encrypted message was typed on another Enigma machine at the receiving end with the same settings, the lights would spell out the hidden message and decode it. History: How the code was brokenThis machine was invented in 1923 by Arthur Scherbius in Germany and was sold for encrypting business communications. The German army adopted it and modified it, but incredibly, Polish mathematicians (led by Marian Rajevski) developed a method for unscrambling its messages, helped by a German agent who provided some disks. Just before the invasion of Poland by Germany in 1939, the Poles made their achievements available to France and Great Britain (including the "Bomba" sorting machine for decrypting the code, and reconstructed Enigma machines). The Germans kept modifying the code, and used it widely. In particular, one improved variant was used to communicate to submarines at sea, which around 1941 almost broke all shipping links to Britain. For instance, the code could direct subs to where supply convoys from Canada and the USA might pass, based on observations by submarines, airplanes and agents. If the allies could read such messages, ships could be diverted to different routes, and all the subs would find would be an empty sea, or perhaps a sub-hunting frigate. The initial setting of the rotors was changed every day by all operators, in a prescribed order, so it was essential not just to break the code, but to do so quickly. A British team addressed the problem--headed by Alan Turing, a math genius, using the Polish methods, a supporting crew of experienced cryptologists, clever guesses and the (very rare) capture of disks from submarines. It just barely managed to keep ahead of the game, but it did decode many messages. At a certain point the Germans expanded the machine by providing a 4th disk (as illustrated above), and more choices of disks. The US was by then in the war (and losing many ships to German submarines), but a large number of modified bigger "Bombas" installed in Washington managed to continue breaking the code
It is a fascinating story with many twists and turns, and interesting books exist about it. "Enigma: The Battle for the Code" by Hugh Sebag-Montefiore is highly recommended, though it can be technical in spots.
Allow yourself plenty of time to view the many unique exhibits; NSA veterans sometimes serve as guides, and may have stories to tell. The catch is--it is only open on weekdays during working hours, or on the first and 3rd Saturday of the month. You will be able to operate an Enigma machine, view the "Bomba" and much more.
|